
The Birth of The OPEnS HUB
Abstract
For the past several weeks the primary focus of myself and the other undergraduate researchers at the OPEnS Lab has been to get a working, deployable prototype of an Evaporometer (link here) sensor for use for a partner research group. This project required numerous data transmission protocols and untimely it is our hope to add remote data-logging capabilities using the Ethernet Feathering.

Our Ethernet Featherwing Shield integrated with the Adafruit FEATHER 32u4 RFM95 LoRa Radio board.
Objective
The goal of this project is to establish a means of remotely data logging sensor data to a google sheet via the Ethernet Featherwing shield and the third party cloud based API, PushingBox. For more on how to set up the google sheet and PushingBox service please see a previous project I did using the ESP8266 WIFI chip found here.
Materials and Methods
The key components required for this project were 1) the Ethernet FeatherWing Shield , 2) The Adafruit FEATHER 32u4 RFM95 LoRa Radio – 915 MHz (or Feather board of preference), 3) an authorized Ethernet port with access to the internet, 4) Ethernet cable, 5) Solder, Header pins, and basic electronic skills, 6) and of course a computer with the Arduino Integrated Development Environment (Latest Version downloadable here).
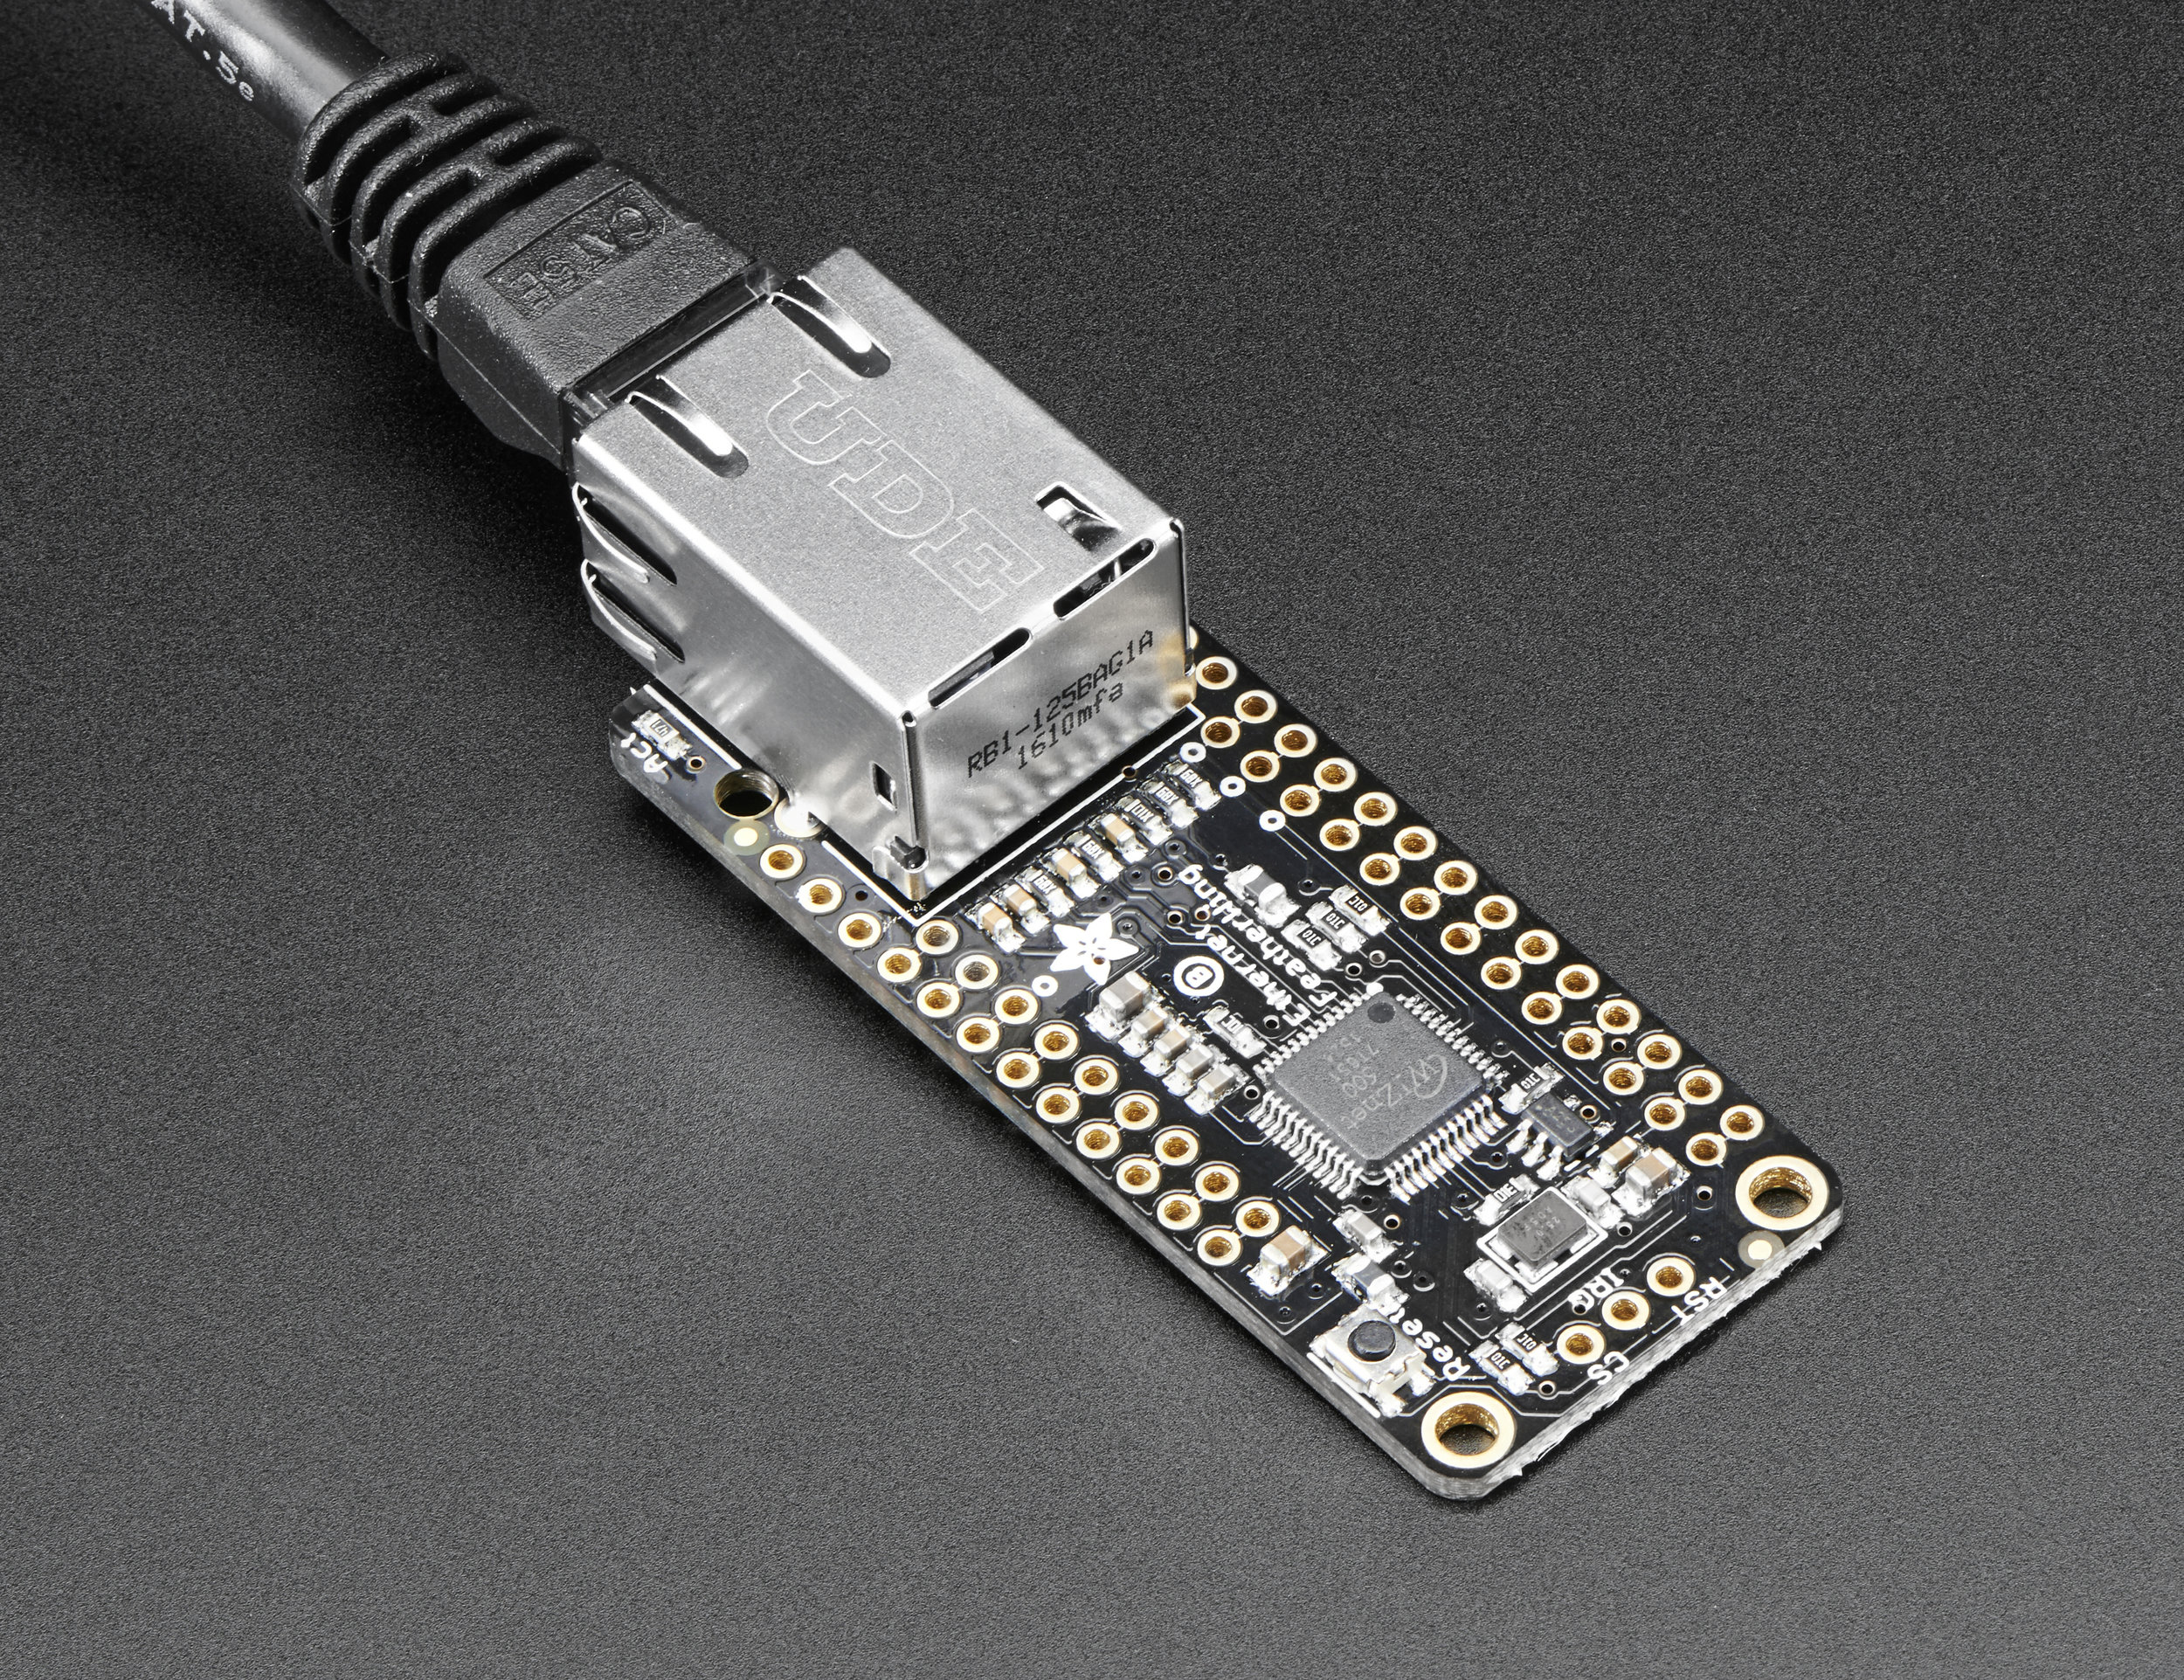
Bare Ethernet Featherwing Shield
More About the Featherwing
The Ethernet FeatherWing plugs into any Feather (all in one microcontroller made by Adafruit, more info here) and adds hard-wired networking. To make it as cross-platform compatible as possible, the board is set up using SPI, plus one extra configurable pin. This Ethernet option allows for a strong reliable connection to the internet and can allow for fast, real-time updates via any wired access point.
Results/Discussion
Preliminary testing of the Ethernet Featherwing showed promising results, however more testing and code modification will be needed in order to log data to google sheets using Domain Name Servers. However, below is some sample code used to determine if a connection has been made to the internet using Adafruit servers.
- /*
- Web client
- This sketch connects to a website (http://www.adafruit.com)
- using an Arduino Wiznet Ethernet shield/FeatherWing.
- created 18 Dec 2009
- by David A. Mellis
- modified 7/14/2017
- by Tom DeBell, For use in the OPEnS Lab
- */
- #include <SPI.h>
- #include <Ethernet2.h>
- // Enter a MAC address for your controller below.
- // Newer Ethernet shields have a MAC address printed on a sticker on the shield
- byte mac[] = { 0x(), 0x(), 0x(), 0x(), 0x(), 0x() };
- // if you don’t want to use DNS (and reduce your sketch size)
- // use the numeric IP instead of the name for the server:
- //IPAddress server(74,125,232,128); // numeric IP for Google (no DNS)
- #define URLHOST “www.adafruit.com” // name address for Adafruit (using DNS)
- #define URLPATH “/testwifi/index.html” // url to grab
- // Set the static IP address to use if the DHCP fails to assign
- IPAddress ip(192, 168, 0, 177);
- // Initialize the Ethernet client library
- // with the IP address and port of the server
- // that you want to connect to (port 80 is default for HTTP):
- EthernetClient client;
- unsigned long lastConnectionTime = 0; // last time you connected to the server, in milliseconds
- const unsigned long postingInterval = 10L * 1000L; // delay between updates, in milliseconds
- // the “L” is needed to use long type numbers
- //#define WIZ_RESET 9
- #if defined(ESP8266)
- // default for ESPressif
- #define WIZ_CS 15
- #elif defined(ESP32)
- #define WIZ_CS 33
- #elif defined(ARDUINO_STM32_FEATHER)
- // default for WICED
- #define WIZ_CS PB4
- #elif defined(TEENSYDUINO)
- #define WIZ_CS 10
- #elif defined(ARDUINO_FEATHER52)
- #define WIZ_CS 11
- #else // default for 328p, 32u4 and m0
- #define WIZ_CS 10
- #endif
- void setup() {
- #if defined(WIZ_RESET)
- pinMode(WIZ_RESET, OUTPUT);
- digitalWrite(WIZ_RESET, HIGH);
- delay(100);
- digitalWrite(WIZ_RESET, LOW);
- delay(100);
- digitalWrite(WIZ_RESET, HIGH);
- #endif
- #if !defined(ESP8266)
- while (!Serial); // wait for serial port to connect.
- #endif
- // Open serial communications and wait for port to open:
- Serial.begin(115200);
- delay(1000);
- Serial.println(“\nHello! I am the Ethernet FeatherWing”);
- Ethernet.init(WIZ_CS);
- // give the ethernet module time to boot up:
- delay(1000);
- // start the Ethernet connection:
- if (Ethernet.begin(mac) == 0) {
- Serial.println(“Failed to configure Ethernet using DHCP”);
- // no point in carrying on, so do nothing forevermore:
- // try to congifure using IP address instead of DHCP:
- Ethernet.begin(mac, ip);
- }
- // print the Ethernet board/shield’s IP address:
- Serial.print(“My IP address: “);
- Serial.println(Ethernet.localIP());
- }
- void loop() {
- // if there’s incoming data from the net connection.
- // send it out the serial port. This is for debugging
- // purposes only:
- if (client.available()) {
- char c = client.read();
- Serial.write(c);
- }
- // if ten seconds have passed since your last connection,
- // then connect again and send data:
- if (millis() – lastConnectionTime > postingInterval) {
- httpRequest();
- }
- }
- // this method makes a HTTP connection to the server:
- void httpRequest() {
- // close any connection before send a new request.
- // This will free the socket on the WiFi shield
- client.stop();
- // if there’s a successful connection:
- if (client.connect(URLHOST, 80)) {
- Serial.println(“connecting…”);
- // send the HTTP PUT request:
- client.println(“GET ” URLPATH ” HTTP/1.1″);
- client.println(“Host: ” URLHOST);
- client.println(“User-Agent: arduino-ethernet”);
- client.println(“Connection: close”);
- client.println();
- // note the time that the connection was made:
- lastConnectionTime = millis();
- }
- else {
- // if you couldn’t make a connection:
- Serial.println(“connection failed”);
- }
- }
Below is a screenshot of what the Serial Monitor should print out fallowing a successful test.
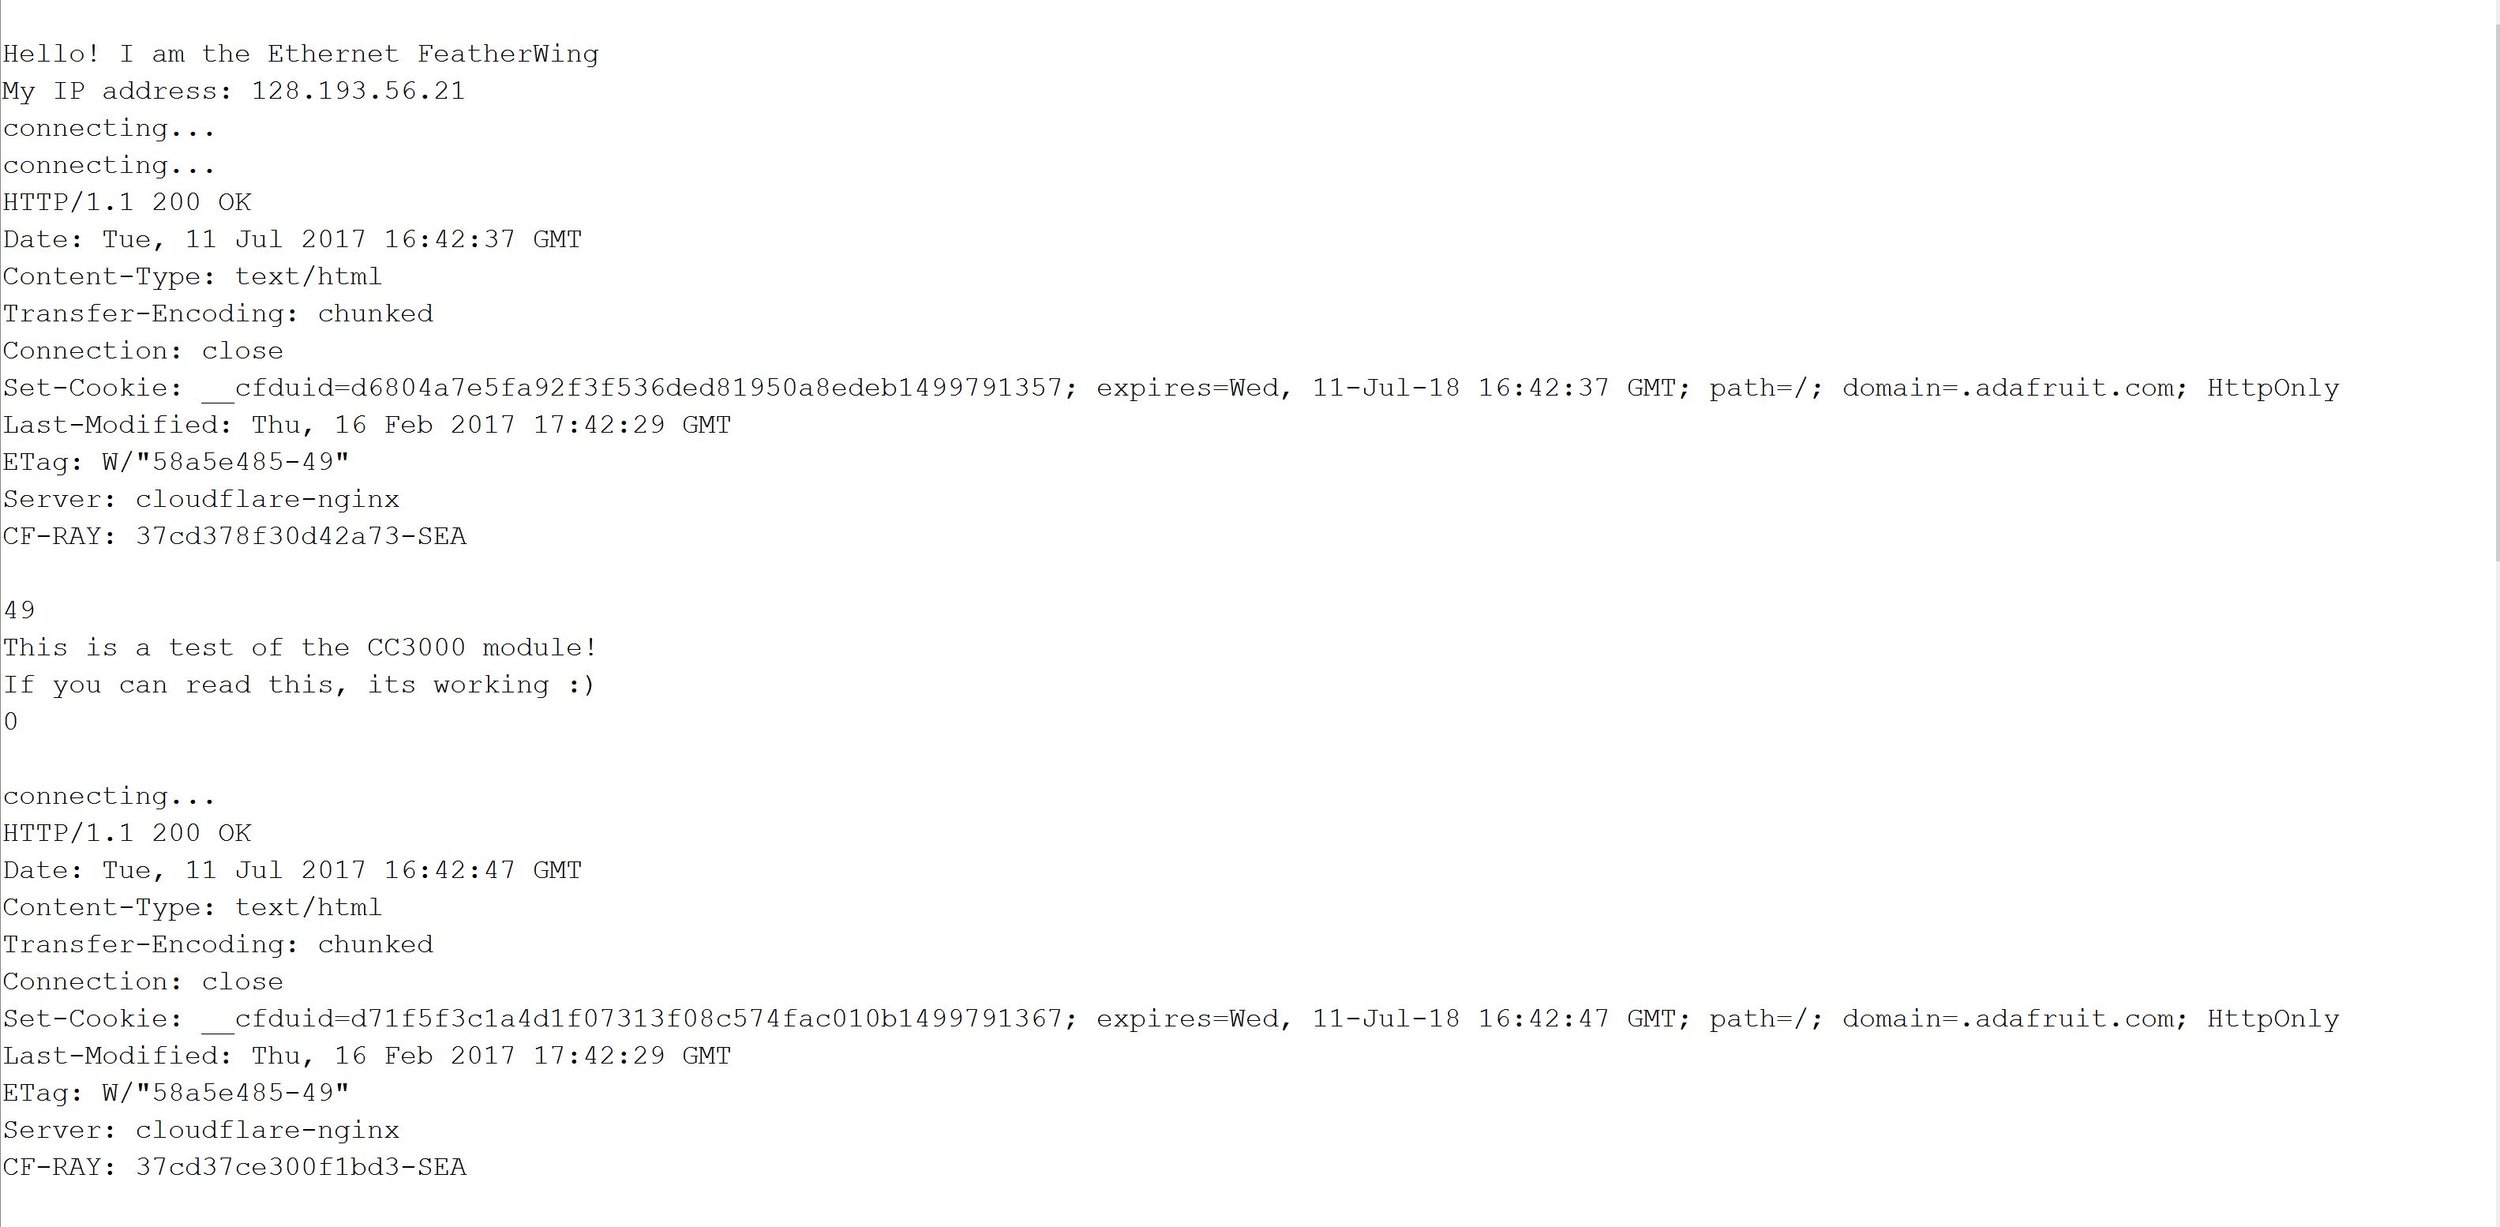
Successful Internet Connection Test!
Future of Project
More updates will be posted here once a connection to Google Sheets has been made.
– Tom DeBell, Beginning/Continuing Researcher Support Program Researcher