
By: Alex Krejci
Abstract/Introduction
This light-weight, low-cost weather station is being designed as a solution for collecting weather data while the station is mounted to a temperature-sensing fiber optic cable that is suspended by a weather balloon. After mounting to the fiber, the station will be lifted into the air up to several hundred meters, where it will collect auxiliary data and corroborative data to support temperature, humidity, and wind speed data collected by the fiber. The station is designed to be low cost such that it could also be used for a variety of other weather monitoring applications.
Parts
- Electronics
- Teensy 3.2 microcontroller
- SHT31 – Temperature and humidity sensor
- BMP280 – Pressure sensor
- IR led and receiver with LM358 op-amp comparator – wind speed
- BNO055 – 3-axis orientation sensor as well as 9 dof imu
- DS3231 – real-time clock
- MicroSD port
- RGB LED
- Lithium polymer battery – 350 mAh
- Custom PCB
- Housing
- 3D printed body and head
- O-ring to seal from water
- Propeller with housing for IR led and receiver
- Mounting
- 3D printed mounting clip to attach device to bearings
- Thrust bearings with washers
- 3D printed bearing support post
- 3D printed fiber grippers
- Wood frame to attach fiber grippers to bearing post
Measuring Capabilities
• Temperature
• Humidity
• Pressure
• Pitch, roll, yaw/wind direction – pitch tells us how much the head of the vane tips up or down so we can correct for the wind speed as this reduces wind cross section. Roll isn’t as critical, but is important to monitor for anomalous events. Yaw gives us the device orientation; this should be the same as the wind direction.
• Acceleration, magnetic field, and angular velocity – The values are combined into a sensor fusion algorithm to give pitch, roll, and yaw. Recorded separately, they give us an idea of what is happening especially during anomalous events. The recorded data can’t be used to calculate pitch, roll, and yaw in post-processing as the recording frequency is lower than the in-situ sensor fusion algorithm update.
• Wind Speed – using the propeller, we get an idea of wind speed. This will be combined with pitch measurements to correct for cross-sectional changes as the device will oscillate as it hangs on the fiber.
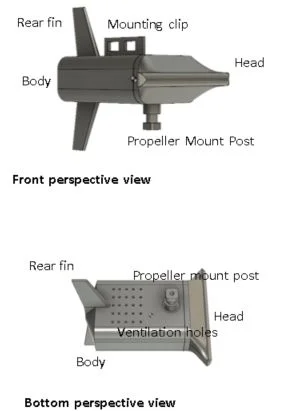
Housing Design
The housing for prototype 2 is composed of two parts, the body and the head. The body is where the electronics will be house. It has a large rear fin for orienting the device into the wind. The mounting clip is used with a 3D printed mounting bracket that allows the devices to hang from a thrust bearing assembly. The propeller mount post is where the propeller will hang below the station when assembled; this includes a hole for wires to run through. The head is easily removable and creates a water tight seal for the electronics as well as housing the battery. When the head is removed, you will have easy access to the SD memory card, an indicator light letting you know the status of the device, the battery connector for charging, and the microcontroller USB port for reprogramming. The bottom side has ventilation holes to allow airflow for the temperature, humidity, and pressure sensors that are all positioned just above the ventilation holes. The holes are also angled so that air can easily flow in from the front and out the back.
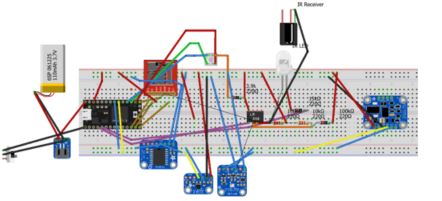
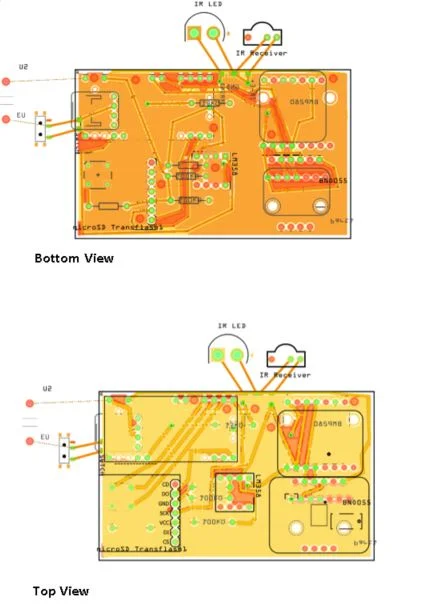
Electronics Design
The circuit design is shown below in breadboard view as well as the two sides of the PCB. Currently the circuit is built by printing a custom PCB and soldering the breakout boards for each chip onto our custom PCB. The wind speed sensor is shown as an IR led, IR receiver, and an op-amp comparator circuit. A teensy 3.2 with a Cortex M4 processors is used as the microcontroller.
All devices are chosen to run at 3.3V, and most devices communicate over I2C protocol. This limits the number of wires needed, and also makes it easy to add or swap out I2C parts.
The device is programmed to sleep between measurements to save on power. The orientation sensor, however, stays awake currently. Shutting it down will interfere with the calibration. And sleeping interferes with the orientation calculations that require constant input of data.
Operation
When operating, the station is turned on with a switch. The station undergoes a startup sequence with a color-coded Morse code sequence. Each device is checked for operation. If the morse code is green, the device is operation, if red, it is not. For example, the real-time clock is coded as the Morse letter r (dot dash dot). If a red light is flashed in this pattern, the clock has a problem, if green, it is good. Blue lights indicate some other status.
If all green lights occur, then the device is ready to calibrate. The BNO055 is calibrated by going through a sequence of steps. First, the device should be left stable for ~5 seconds. This calibrates the gyroscope. Each time the gyro is started, it has a different offset value. Allowing the device to sit still lets the device determine the offset and correct future values.
Then, the device should be orientated with each of the six sides facing downward. Slowly wobble the downward face. The goal here is to let the sensor read the earth’s gravitational field on only one axis. It does this by finding the peak value of that axis as you wobble the downward face. Hold each axis downward for about 5 seconds.
Finally, the move the device in as many orientations as possible. This is often done by sweeping the device in a figure-8 pattern. If you do this will spinning around (an entertaining dance for sure), it will provide better results. As you do this, the device creates a map of the magnetic field that it measures on each of the sensor axes. It then calculates hard and soft iron corrections for the magnetometer. This is usually the most difficult sensor to calibrate, and calibration often changes as the device is left out. This can be done for ~60 seconds.
When the device collects a data point, it flashes the indicator LED before collection (short flash) and when storing (long) the data. If the light is green, the device was calibrated during the previous reading. If the flash is red, the device was not completely calibrated.
The station will collect data at a pre-programmed time interval and store the data on an SD card. It is powered using a 350 mAh lithium polymer battery, giving a battery life of 15 hours. When done, the SD card can be removed and the data uploaded to your computer.