RFID Sensor Update

Author: Brett Stoddard

Hello all, it’s been a while since the last sensor status but from now on I’ll be working to increase my posting frequency.

Since the last update, many things have been happening on the sensor end. First, the OPEnS lab bought a new RFID module to interface with the Arduino UNO and have semi-officially scrapped the LinkSprite LSID-0702 reader. From here on out, we will be using the SparkFun Simultaneous RFID Reader – M6E Nano shield. I was really excited to get working with this reader because it’s documentation is a lot more readable and through than the other modules I’ve worked with.

That documentation included a SparkFun proprietary library especially made for use with the Arduino UNO. I forked this library on GitHub and have been adding to it a few functions specifically geared towards reading the moisture information from Smart Trac RFID tags. For the most part, these functions seem to work! The original SparkFun library is available by clicking here. The OPEnS lab version of it that I have and will be adding to can be found by clicking here.

The rest of this blog post will be dedicated to the results of tests run to prove that the retrieved values are dependent on the actual moisture of the chips. “Wet” tags were held under a stream of moving water in the sink for five to ten seconds. “Dry” tags are either tags that were never wet or ones that were set out to dry for a few days. 

FIGURE 1. Raw, unprepared data from the serial port of the Arduino UNO when example code from the library is run.

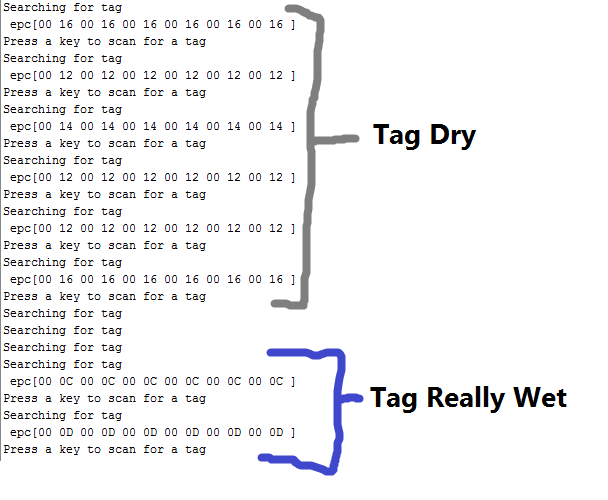
This data was gathered by modifying a read EPC byte command to read a different registry. What that means is that the data is unparced and looks gross. The important thing from this data is that the sensor code was reading a different number when it was wetted. When dry the tag had a value of either 12 or 14 HEX (18 or 20 decimal). Then when that same tag was run under the sink it read a value of 0C or 0C HEX (12 or 13 decimal). Being able to tell the difference between really wet and completely dry is a large step forward for this project and this data, if consistent, will allow us to do just that. However, as always, more testing will be needed to make this process robust enough for use in the field. 

Getting in the air

Author: Jonah Siekmann

A few weeks ago, I started putting together various different quadcopter builds and comparing cost, efficiency, and lifting power. I’ve come up with a few builds that I think are pretty solid:

I also had two drones laying around in my dorm that I’d built the previous year, and I figured I could use those to do some tests on how long they could stay in the air with a payload of a given weight, since that would give us concrete data on what specs might or might not work.

However, to do that I needed to rewrite the flight controller I’d written previously, because the old version used rate mode – which means that the quad didn’t know which way was up, and it was up to the user to make sure it stayed pointing in the right direction. To carry a payload (and eventually navigate autonomously) I needed to make the quadcopter autolevel – meaning the flight controller needs to know which way is up, and can stay pointing up (instead of say, pitched 30 degrees forward). 

So for the last few days, I’ve been putting together a new flight controller paired with an IMU (instead of a standalone gyroscope) and trying to get that working. I had an issue that kept me grounded for about half a week where the MPU6050 (the IMU I’m using) wouldn’t start up unless the Arduino Uno was plugged in through USB – I’m still not sure what exactly was causing that, but I wired it up to a UBEC and it worked fine.

Today, I flew the drone with a payload roughly the same weight as the RFID reader we’ll be using – about 750 grams. The drone flew surprisingly well with the extra weight, although it was still very difficult to manage – the PID values are tuned for a drone about 750 grams lighter. Here’s a picture of me trying my best to keep it in one spot (hence the facial expression):

However, I encountered an issue where it seems like the Arduino Uno shuts off randomly, while leaving the motors spinning – usually resulting in the drone flying into a wall or nearby bush. This isn’t a very desirable outcome when carrying a sensor package worth almost $500, so I need to figure out what’s causing that before we do any testing with it. I have a feeling it’s due to a crappy solder connection on my part, so over spring break I think I’ll just rebuild the whole thing and see if it keeps happening.

-Jonah Siekmann, URSA researcher

Building a Drone

Author: Jonah Siekmann

For this project, we’ll need to construct a drone that will carry the RFID reader around a crop field. It’ll need to remember the locations of every new RFID ‘Dogbones’ moisture sensor it encounters, and store the GPS coordinates so that it can return to the sensor later. We’re not sure yet how much weight it’ll need to carry, which leaves a lot of the the specs of the drone up in the air. We’ve come up with a general parts list, however, which includes the following:

CC3D Flight Controller

750KV Motor (x4)

30A ESC (x4)

4000mah 3s battery

12×4.5″ propellors

650mm frame

Arduino Uno

GPS module

RC Transmitter/Receiver

Our idea for flying the drone autonomously involves hooking up the Arduino to the CC3D flight controller’s RC receiver pins, and simulating the 1000-2000us pulses that the flight controller would expect from a receiver with the Arduino. This way, the CC3D flight controller does all the low-level attitude hold and hovering work, while the Arduino is free to read the GPS sensor and control the position of the quad by pretending to be an RC receiver.