Transferring CAD of Rain Catcher Calibrator from OpenSCAD to Fusion360

Fusion360 a smarter tool for makers and professionals to use when making parametric designs. It uses a GUI to input the parameters and doesn’t require any previous knowledge in programming.  I have decided to transfer the design over. This will make it easier to modify when the user downloads our files, especially if they don’t have any programming experience.


Updated Validator Data

After another day of data, I created another set of graphs that displayed the relationship between the ratio of beaker mass to validator mass and validator’s water mass (calculated by subtracting the dry weight of the validator from each data point), per Selker’s request. What this graph shows is that the validator’s water evaporates at a faster rate relative to the validator’s total mass than the water in the beaker. Below is the set of graphs for trial 1 and trial 2.


ratio vs val waterratio vs val water

Using the Laser Cutter to Make a 3D Model

We took a 3D model of an Icosahedron and used 123D Make to create a 3D-laser cutter version. 

CAD Model

3D Model

We can now show demonstrate one of the uses for the laser cutter. This could be useful when someone needs to make a 3D model of a topographic map. This is also considerably faster than 3D printing this piece. 

Rain Validator Observational Experiment Results


validator datavalidator data

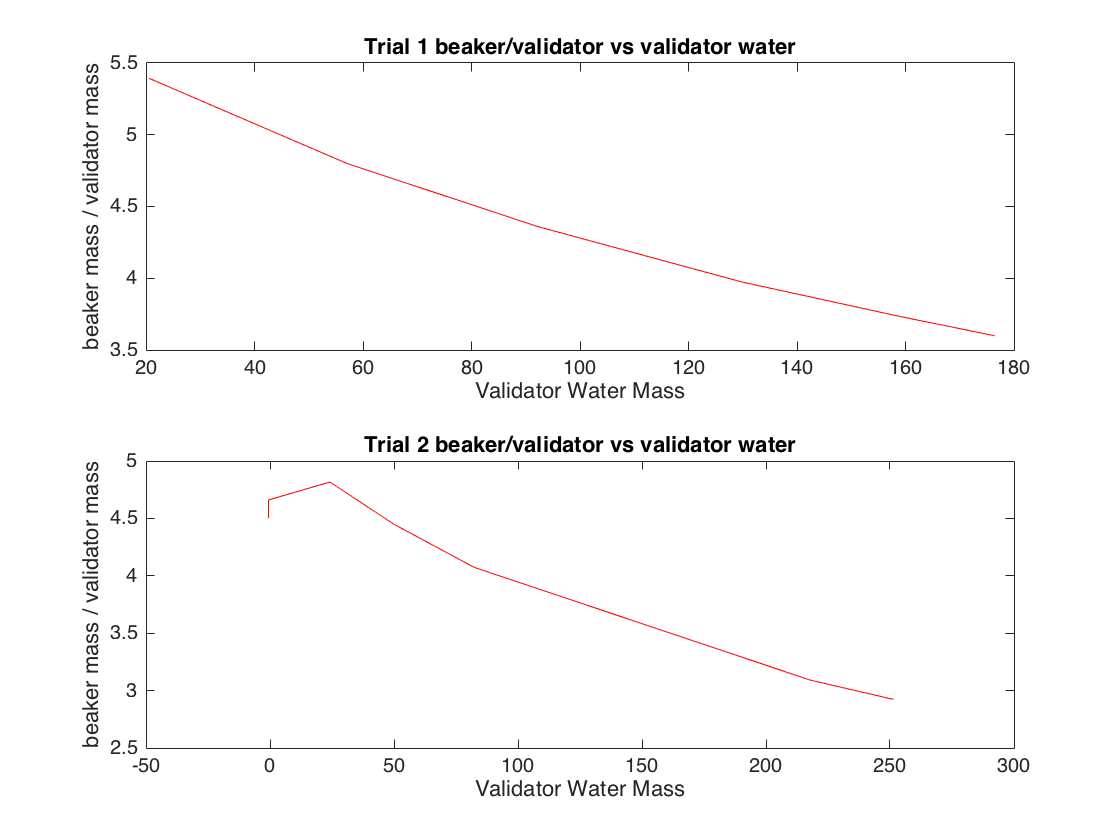
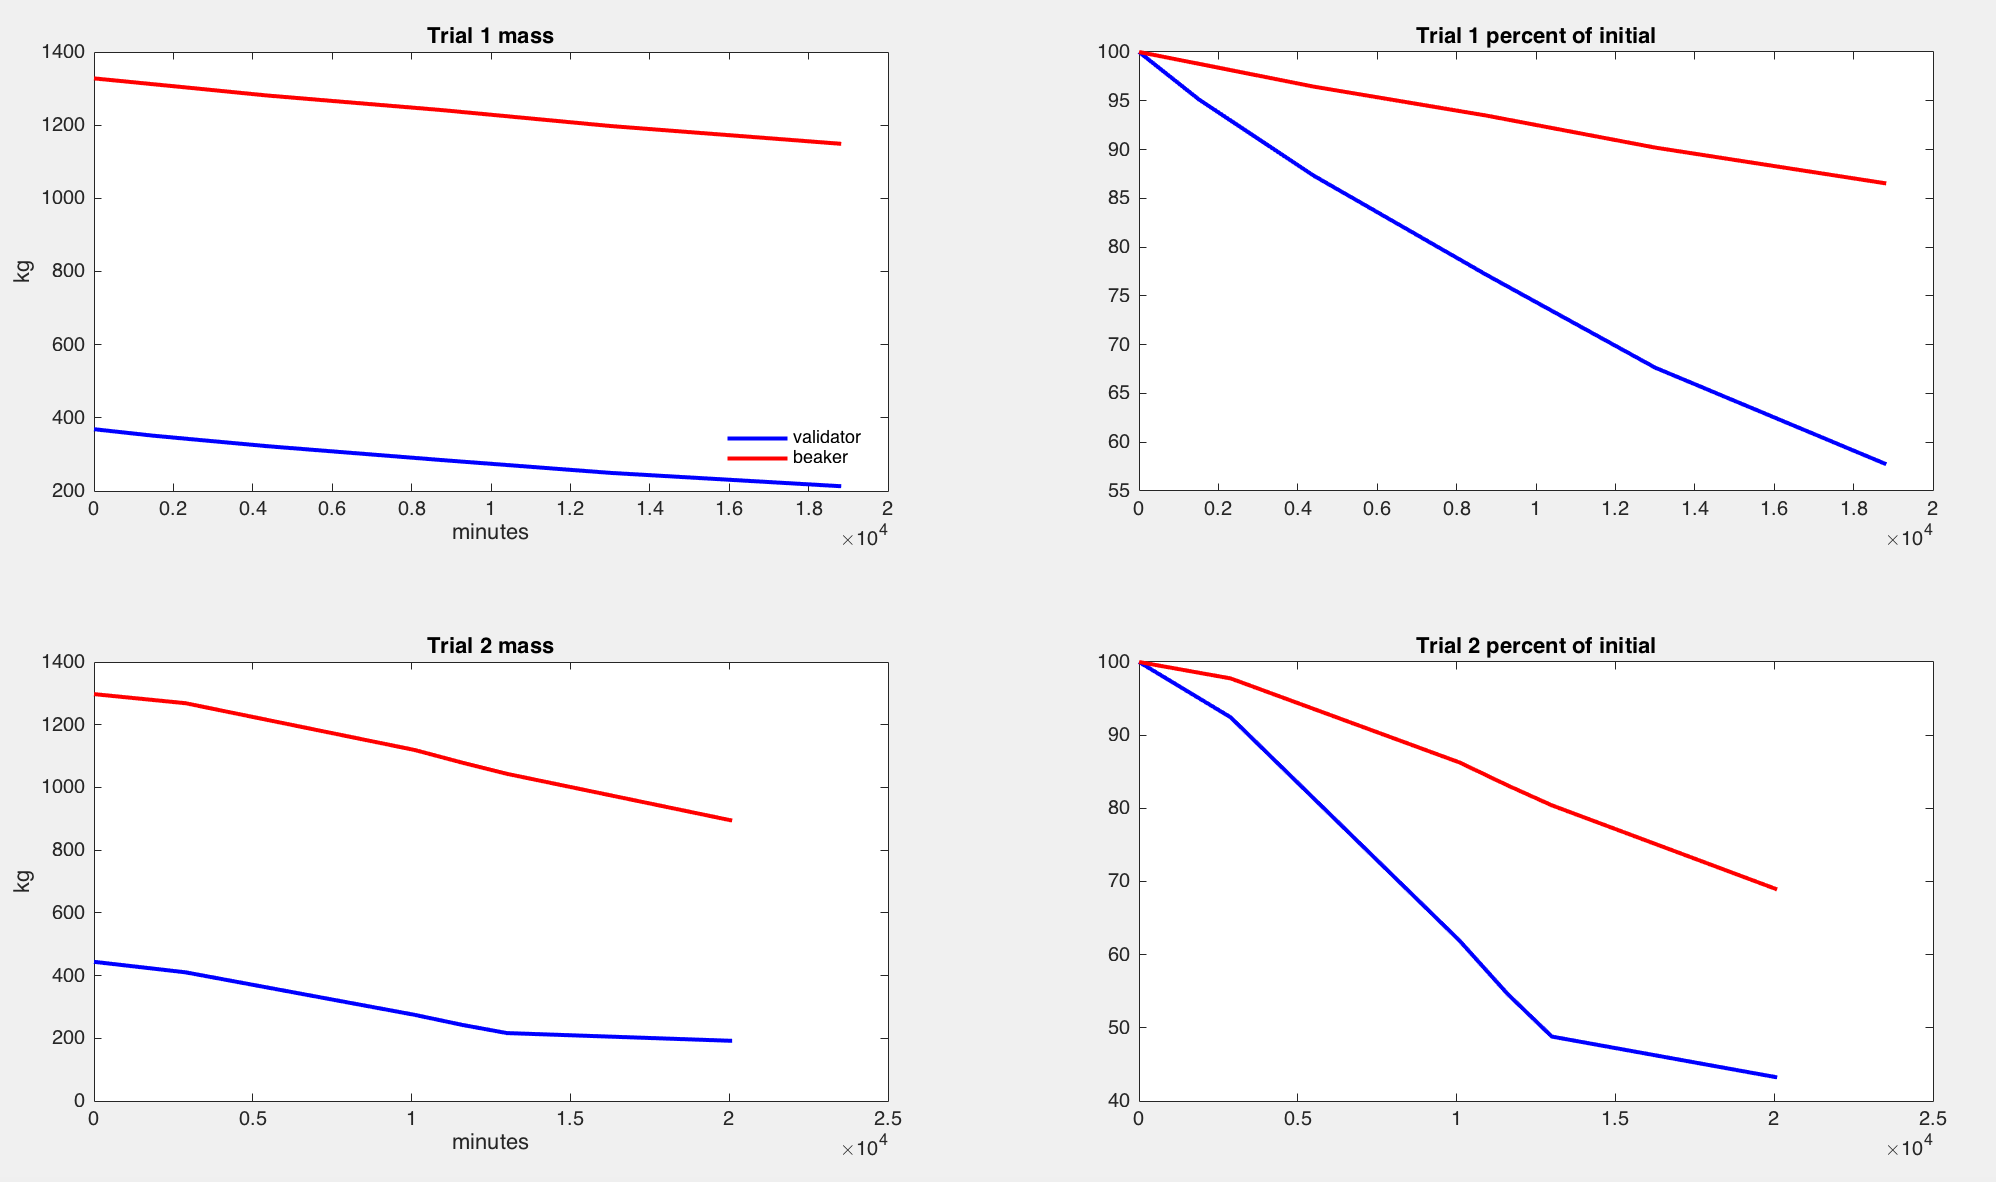
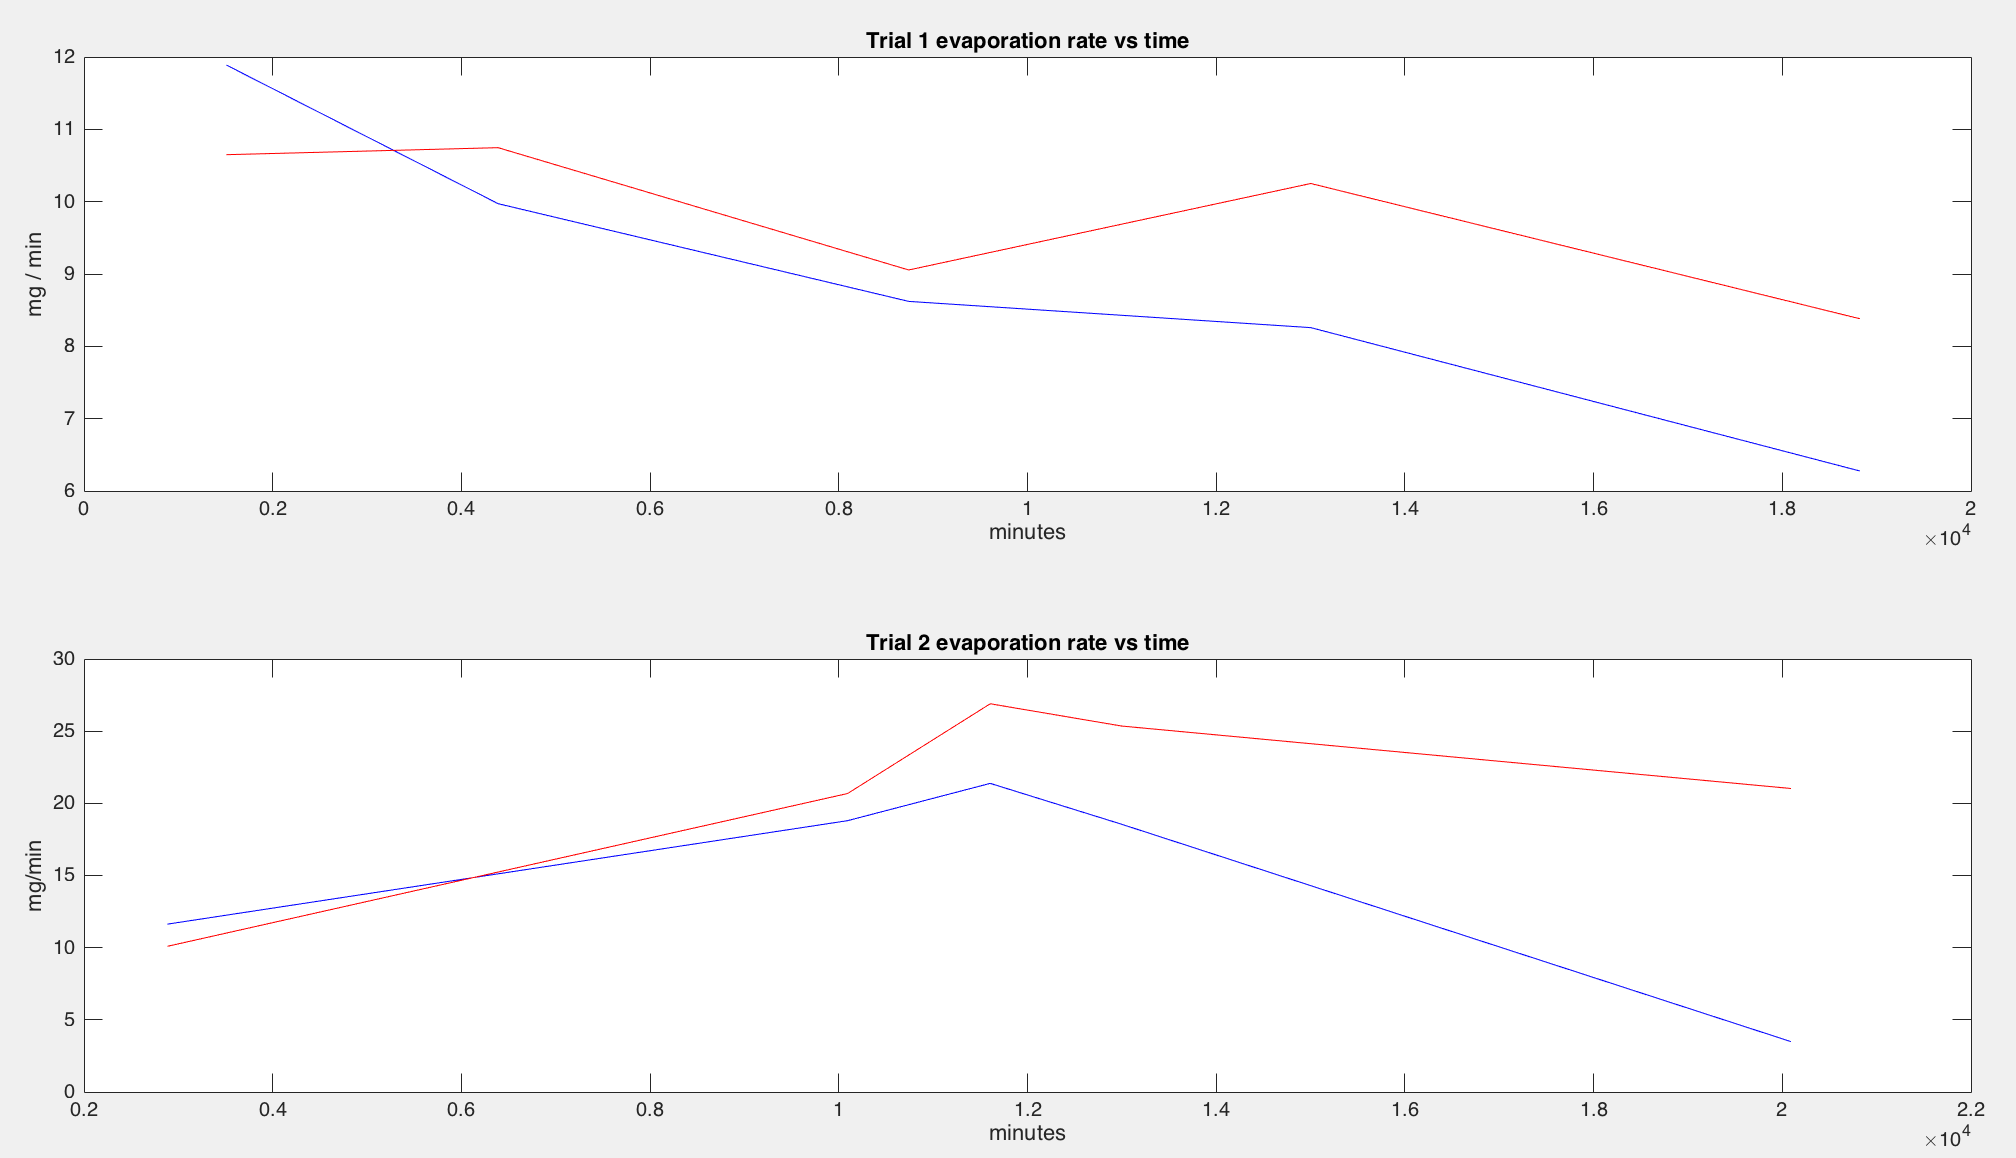
The rain validator test has undergone two trials, each spanning about two weeks. The results so far seem to be promising: the validator’s rate of evaporation is very similar to the beaker’s. Below is a graph of the average rate of evaporation at each point, calculated by taking the difference in mass between each set of points and dividing that by the change in time between them.

In all graphs, red represents the data from the beaker, while blue represents the data from the validator.


validator evaporation rate vs timevalidator evaporation rate vs time

It’s interesting that for both trials, the rain validator’s water evaporates at a faster rate for the first day and then it’s rate becomes increasingly slower than that of the beaker. The beaker has a larger radius, so this is likely due to a combination of the saturated wick having more surface area and a smaller percentage of the validator’s total mass remaining over time compared to the beaker. This can be seen in the right two graphs in the first picture: the beaker’s percent mass decreases more linearly than the validator’s, which has a slight upward concavity.

Some errors with these trials include the changing humidity of the environment as well as the temperature of the room, especially since the beaker and validator were set near an oven that ran at varying temperatures for varying amounts of time. Because the beaker’s and validator’s locations were constant and adjacent, the validator’s performance can accurately be compared to that of a plain, 1L beaker of water.

Super Validator

The first prototype of the rain catchment validator seems fairly successful. We have yet to attach a strain gauge to it, though some testing is being done to see how the evaporation rate compares to water in a 1 L beaker, started by Dr. Selker before he left.

The design was changed to fit to the strain gauges we purchased, though it seemed flimsy and I had concerns about the strain gauge connection bending or breaking under stress, as well as the layers delaminating or the overall form of the device changing over time. I added some structural supports to most aspects of the design (picture 2) and am running a print now. This version should be able to be tested with the strain gauges.


Isotopic Sampler Bag Cap

A custom bag cap was necessary to function as a sealed connection between the aluminum foil bag and the fitting on the copper tube that attaches to the checkvalve. The dimensions of the bag’s mouth were measured with calipers and a first prototype was designed based on two pieces: an inner piece that presses against the end of the mouth with an o-ring and that can be tapped to fit to a 1/8 NPT fitting, and an outer piece that screws onto the mouth and forces the inner piece to seal (see picture 2).

The first prototype worked well and was lightly modified over time. Most of the caps were printed in HIPS as we were out of ABS at the time, but both ABS and HIPS print well.